

The key to mastering any beadwork stitch is muscle memory. With enough practice, the moves and steps become second-nature, allowing you to achieve better results over time. In order to practice peyote stitch and gain that ‘groove’ for how the stitches work, it is best to skip the frustration of those first few rows and go straight to the skip-a-bead-add-a-bead flow. Working peyote stitch off of a strip of right angle weave, or with a Quick Start Card is one way to do this. I like two-drop peyote because you still get the benefit of practicing the first rows of peyote stitch, but in a much more cooperative format.
Working with multiple beads per stitch - rather than the one bead per stitch of traditional peyote - creates a stronger base that holds together much better, and is easier to grip. This helps to prevent any twisting of the beads while you work, giving you a cleaner start. Once you’ve made a few samples or projects with two-drop peyote, you’ll have some valuable insight into how the technique feels, making your future attempts and traditional peyote stitch that much stronger.

Failed First Attempts and Peyote Stitch
I’ve used 8/o seed beads for the basic instructions below, but I highly recommend using 11/o seed beads for your first few tries. The extra space in 8/o seed beads doesn’t grip the thread as snugly, which can make it difficult to control the beadwork as you build. Japanese or Czech seed beads will both work – the added bonus of two-drop peyote is that slight changes in bead shape are automatically corrected and supported by the surrounding beads – one more reason that it’s a great technique for beginners.
Like most peyote stitch variations, you’ll need to string the first 2 rows. The real work begins once you start to stitch on the third row. This technically isn’t relevant unless you’re working with a pattern so don’t worry if it sounds confusing; it is important to remember that with basic (even count) peyote, the first beads that you pick up must be an even number. For two-drop peyote, they must also be divisible by 4, since each stitch is two beads, and there must be an even number of pairs in those first 2 ‘rows’. We’ll start with an easy 12 beads – use this basic technique to stitch a few practice panels of any length you like. This is a great opportunity to test out any new bead colors in your stash, or start a swatch collection to help with color selection in future projects.
Basic Two-drop Peyote Stitch:
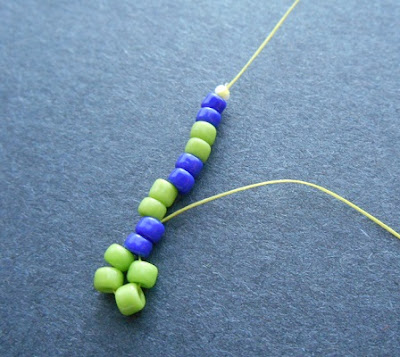
1. Attach a stop bead to a comfortable length of beading thread, leaving at least a 6 inch (15 cm) tail. Pick up 12 seed beads and slide them down to the stop bead. Flip the work so that the stop bead is facing away from you, and the working thread is facing towards you.


2. Grip the last 4 beads added and the start of the working thread firmly with your off hand, allowing a bit of space to needle through. Pick up 2 seed beads. Skipping the last 2 beads picked up (the two beads closest to you) stitch up through the next 2 beads in the strand and gently pull snug. The new beads should click into place below the beads that you’ve just stitched through.

For best results, maintain your hold on the beadwork, nudging it downward bit by bit as you work the rest of the row. Once all of the beads are in place, the beadwork will be sturdier – until then it is easy to lose your place or twist the beadwork, resulting in a big mess right out of the gate.
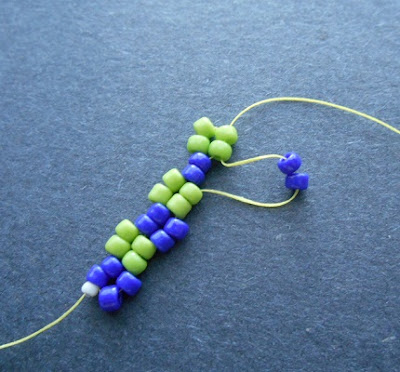
3. Pick up 2 seed beads. Skip over the next 2 bare beads in the strand (the two above those you’ve just stitched through) and stitch up through the following 2 beads. Pull snug so that the new beads click into place. Repeat once more to finish the row.


4. Flip the beadwork so that the working thread is facing you again. You should be able to recognize the beads that were added to the previous row. Often called ‘up’ beads, the last row along the edge of peyote is always raised a little higher than the beads of the previous row. It is now a little easier to see those first 2 rows that we strung – row one is green, row two is blue, and the third row that was stitched on is also green.


Pick up 2 seed beads. Stitch up through the first set of raised beads from the previous row (the last 2 beads that you added in the previous step). Pull snug so that the new beads click into place between the surrounding beads.
5. Pick up 2 beads, and stitch up through the following set of raised beads. Pull snug, then repeat once more to finish the row.


6. Repeat steps 4 and 5 until your panel reaches the desired length.

Now that we’ve covered the basics, it’s time to make a practice piece to build that muscle memory and prepare for future peyote projects. If you’re ready to move beyond beading samples and swatches, this simple two-drop cuff is a great place to start. It has a built-in fringe and an easy freeform pattern that is neither dull nor distracting. You’ll need 11/o seed beads in 3 colors, 2 colors of 15/o seed beads, and a clasp of your choice. You can substitute the 15/o seed beads with additional 11/o colors if necessary.
Ocean Waves Two-Drop Peyote Cuff with Trim:
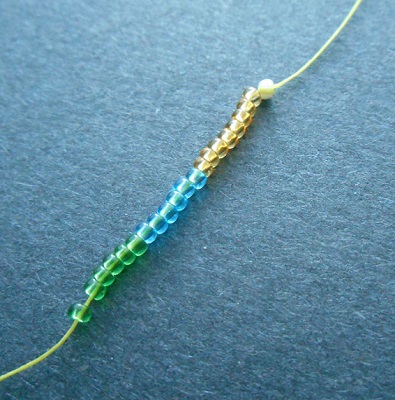
1. Attach a stop bead to a comfortable length of beading thread, leaving an 8 inch (20 cm) tail. Pick up 8 topaz 11/o seed beads, 6 blue, and 6 green. Flip the beadwork so that the stop bead is facing away from you.

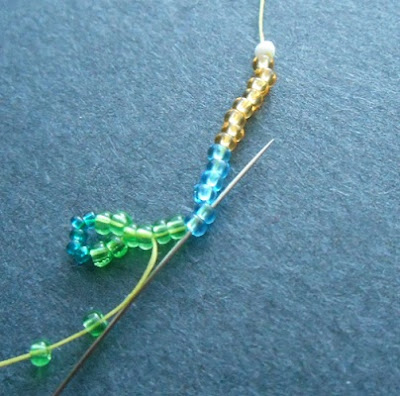
2. Pick up 5 green 15/o seed beads, and 2 green 11/o. Skipping the last 2 green beads added in the first step, stitch up through the following 2 beads and pull snug so that the 2 new green beads click into place. The 15/o accents should form a small loop of fringe along the edge.
3. Pick up 2 green 11/o and stitch up through the following 2 (blue) beads. Pull snug.

4. Add 2 blue, 2 topaz, and 2 topaz to finish the row with two-drop peyote.
5. Flip the beadwork, and pick up 5 topaz 15/o, and 2 topaz 11/o beads. Stitch up through the last 2 topaz beads added in the previous row and pull snug to click the new 11/o’s in place.


6. Complete the rest of the row, adding 2 beads per stitch: topaz, blue, blue, green. On the final stitch, pass up through the last (nearest) 2 size 15/o beads on this edge.
7. Flip the beadwork. Pick up 3 green 15/o, and 2 green 11/o beads. Stitch up through the last 2 beads added in the previous row.


8. Finish the row with pairs of green, blue, topaz, and topaz.

9. Repeat steps 5-8 until the beadwork reaches the desired length for your bracelet, adding 3 15/o beads at each edge for the remainder. To get the optional freeform look, replace one bead in each 11/o pair at random with the following or previous color, to expand and contract the length of each color section. Repeat the addition 1-3 times before returning to the normal pattern. Replace colors at random intervals along the beadwork.


10. When you've completed the cuff, weave your remaining thread across the last row to secure it, then exit from a central pair, 3 or more rows back from the edge. Pick up enough blue seed beads to create a loop that will fit around your clasp or button. Stitch through the same 2 beads in the cuff again, moving in the same direction.
Weave through the loop and along the last few rows of beadwork 1-2 more times to add strength, then trim any remaining thread.
11. Remove the stop bead from the first tail thread, and repeat step 10, stringing your clasp at the center of a bead loop. Make sure that you are exiting from the same side of the cuff as the previous loop so that the components will connect.

Secure any remaining tail threads in the beadwork and trim. If you’re not yet familiar with the technique, we will fully cover adding and finishing threads in an upcoming Peyote Stitch Master Class lesson. For now, be sure to follow the natural thread path – stitching through 2 beads at a time across the width of the cuff, and turning at the edges. Cross over your tail stitches at least once for added security, then trim the thread as close to the beadwork as possible.

Happy beading!
Mortira
Subscribe * Facebook * Google+
Send your beading questions to InspirationalBeading@gmail.com
Support Inspirational Beading for bonus tutorials and more!
Copyright 2016 Inspirational Beading


WOW! I feel like we/I had a private lesson, which we did! I think you have shared this stitch before...it has given me a 'curve' from time to time...especially, because I don't use it often! Muscle memory is correct. Thanks again! I will bookmark this time!
ReplyDeleteThanks for this! I have been doing multi-drop peyote for a long time but never with a fringe. It adds another dimension to the piece. I love it!
ReplyDeleteThank you so much for the class Mortira! (Lol, Sorry I'm late to class, I took some time off,) Peyote is the one stitch that i cant seem to pin down-your lesson made it seem easy!
ReplyDeleteI cant wait to get to the next class:)